

In this blog entry, we will cover adding additional detail
to the use case dialog. This additional
detail will have the effect of:
·
Enabling the business to make sure the
requirements are complete and consistent
·
Enable the developers to identify constraints
that will modify the requirements before code is written
·
Enable the developers to see enough information
to build good architectures
·
Enable QA to build test cases before the system
is built
Extending the
dialogue
The use case for Withdraw
Money had the following dialogue:
- ATM presents a list of accounts and asks user to select one
- ATM asks user how much he wants to withdraw
- ATM dispenses money
- ATM dispenses receipt
Remember, all of the ATM interactions for authenticating the
user, determining the transaction to execute, and asking for another
transaction is all handled by Authenticate
User.
Adding Interface
Details
An easy way to extend lines 1, 2, and 4 would be to simply
include display shots of what the interface will look like. For example, presenting the list of accounts
could look as follows:
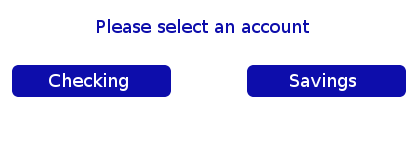 |
| Simple ATM select account screen |
Here we have an extremely simplified example of what the
select account screen might look like.
Adding screen information directly into the use case make is clear what
is desired from the developers. The
business analyst/product manager can then have a productive discussion with the
developers about various interface constraints before the code is
generated.
If the screen shots are produced for an entire set of use
cases before development starts, then the developers can more effectively plan
the architecture of the GUI. In
addition, screen shots will lead to multiple requirements being flushed out
before development starts. Once the
developers get the use cases, you can expect changes to the screen shots because
of constraints that the business analyst was unaware of. This will lead to a productive discussion on
what is possible and the screens can be modified before the coding begins.
Once the project is complete, actual screen shots can be put
into the use case.
Adding Validation
Information
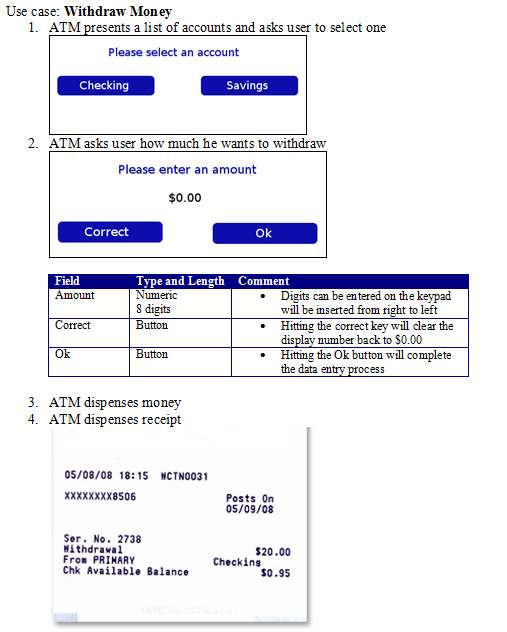
In line 2, the interface may look as follows:
 |
| Simple ATM select amount screen |
Field
|
Type
and Length
|
Comment
|
Amount
|
Numeric
8 digits
|
|
Correct
|
Button
|
|
Ok
|
Button
|
|
Again, by placing the validation and behaviour information
directly into the use case it not only enables the developers to plan the
architecture better but also allows the QA department to verify the code once
it is completed by development.
Adding report
information
In step 4, the ATM dispenses a receipt. As expected, we can show the report in the
use case, or link to the report if it is too long. In the case of the ATM we could show the following:
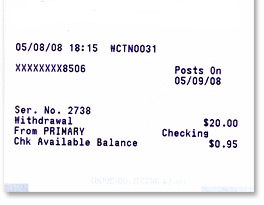
When this additional detail is added to the use case it will
look as follows:
Effects of adding
detail to use case dialogues
By adding the screen shots, data validation, and reports
directly into the use case we extend the dialog with information that needs to
be provided anyways for development to proceed.
By bringing all the information together this way, we can
provoke discussions at the business level and ensure that the requirements are
more complete and consistent before they are delivered to development.
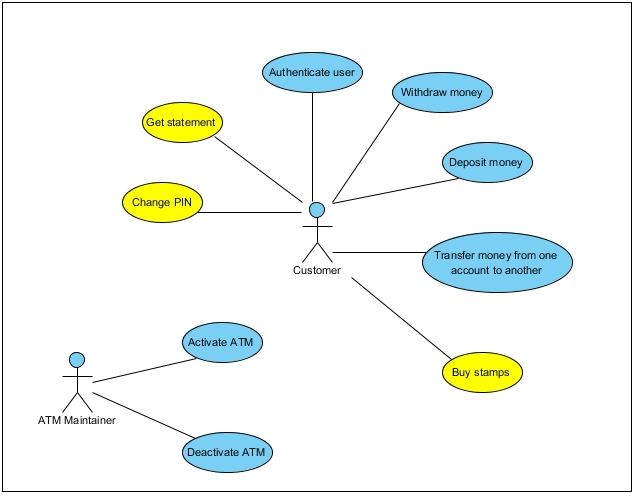
Once a complete set of use cases are created the use case
diagram can be colored to indicate which use cases are in the scope of the
current project.
Once the developers receive the use cases they can then look
through all of the information and plan a consistent architecture. In addition, by looking through the detailed
use cases they can identify where the requirements have to be altered because
of technical constraints. If there are
serious constraints that prevent the requirements from being implemented the
project can be put on hold until either the constraints are changed (i.e.
change technology) or the requirements are consistent with the technology that
you have.
The requirements can be delivered to the QA department at
the same time as development. This
allows the QA department to create a test plan for the use cases and in fact
they will generate one or more test cases per use case. Complete use cases enable the QA department
to be prepared when the code is finally delivered.
Summary
- A use case can be annotated by adding detail to the dialogue of the use case
- We can add screen shots, data validation, and reports
- This additional detail will help complete requirements get to development
- Modifications to the requirements can be made before development as the developers and architects see the annotated use cases
- By inserting the screen shots, data validation, and reports directly into the use case we can provoke a discussion of the requirements to make sure that they are consistent and complete at the business level
- By having this detail prior to development will allow the developers to review the use cases and identify areas where the requirements will need to be changed because of technological or time constraints.
- Detailed requirements can be delivered to development and QA simultaneously which allows QA to build test plans and cases before development is complete.
·
How to add meta-information to determine how and
when a use case is called
·
How to add meta-information to improve project
management
No comments:
Post a Comment